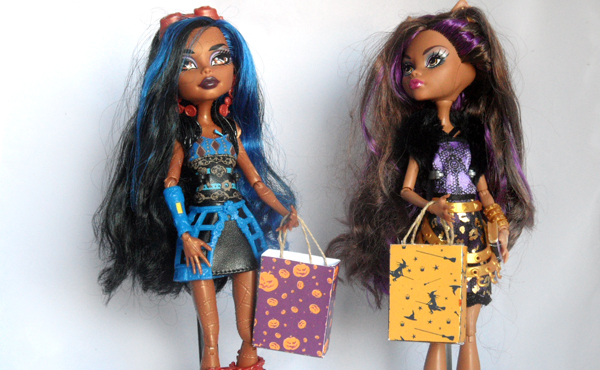
Today I released a new set of digital papers in my Etsy shop. A pack of 24 Halloween themed digital papers. They will be reduced in price for the duration of Shriek Week (until 18th October 2015).
I am going to use some of the papers to make cute little Trick or Treat bags for my 12″ dolls.
First I drew up a template of a trick or treat bag laid out flat. I worked out the sizes by measuring against my doll. This template will fit a 12″ doll such as a Barbie, Monster High, Blythe, Pullip and so on. You could resize it to fit other dolls of course.
Here is a link to the Tin Teddy Trick or Treat Template. There are two versions.
- a JPG which you can just print out – TTTrickorTreatSingle
- a PNG which you can use to make your own digital designs (keep reading, I am going to tell you how!) – TTTrickorTreatTrans
You could print onto card to make a sturdy template for creating multiple bags from your printed scrapbook papers.
But because I am going to use the digital papers, I will add the patterns in my graphics program before I print it out, this will save ink.
You can follow along to see how to do this. You will need a graphics program that can use layers. I am using Adobe Photoshop, but you could also use Adobe Photoshop Elements, Gimp (free), CorelDraw, Serif PhotoPlus (free version available), Adobe Illustrator etc.
Open the .PNG version of the template in your graphics program. This is the version with transparency and is called TTTrickorTreatTrans.


Choose the digital paper you want to use on your bag and drag it into your document.
Then drag its layer below the template one, so you can see the template with the design inside it. You will probably need to resize the digital paper as the pattern will be too big. I resized mine t0 60%.
Move the digital paper layer around so the images are nicely arranged on the front and back of the bag.
The result is below.

Now open a new document the size of the paper you are going to print onto. I am going to print onto thin white card.
Flatten the layers of the bag design you have made and drag it over into the new document. You can then duplicate it as many times as you want on the page before printing it out.
If you want a variety of bags, just go back to your design and undo the flattening. Now you can drag a new paper under the template.
I rotated some of mine so I could fit 6 bags onto one page. If you set the layers to “Multiply” you can move the bags close to each other without any white overlapping.

Once you have as many versions of the bag on your page as you require you can print them out. I recommend saving the file first, just in case!
If you want to make more complex designs on your bags, here is a guide to which part of the template is which. You can use this to plan what you are going to put on your bag, and to help you fold it up.

Assembling the bag is very easy. Score and fold along all the lines. I used a bone folder to make sure the creases were very crisp. If you don’t have a bone folder then you can rub the crease with the back of a spoon instead. On small projects this can make a big difference to the final look.

Apply double-sided tape or tacky glue to the side flap then fold your bag and tuck it under the Back of the bag. You could pop a paper clip on the top to hold it firmly whilst it glues.
Then apply glue to the bottom flap and tuck it up under the Back of the bag.
If your flaps don’t seem to fit very neatly, try cut a thin diagonal slither of the sides of them.
Finally, stick some baker’s twine, paper ribbon, twine, ribbon or thin strips of paper inside the front and back to make straps.

And your doll is all set to go get some candy!

You can of course decorate your trick or treat bags further.
This size of bag perfectly fits 12″ dolls but looks fine on a variety of other sizes too, such as the larger Tonner fashion dolls. After all, trick or treat bags come in many sizes in real life!
Here are Robecca Steam and Clawdeen Wolf (Monster High dolls) setting off to go trick or treating – they didn’t even have to dress up!


